2… 4… 6… 8…
Who do you appreciate?
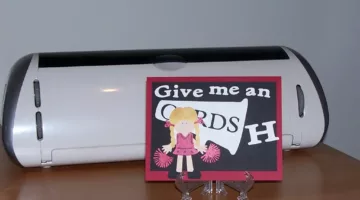
Let her know with this adorable cheerleader card!
I made this card entirely from my Cricut Expression machine, using Plantin Schoolbook for the words, and my new favorite cartridge — Everyday Paper Dolls — for everything else.
That cartridge cuts out so many things! See a sample of the items included. (You can even request to see more!)
Cheerleader Card Basics
The base card is 7-1/4×11″ red cardstock folded in half.
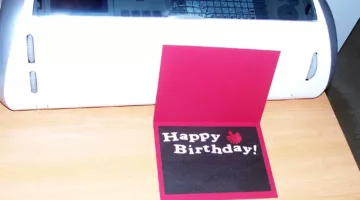
Apply a 4-3/4×6-1/2″ black rectangle centered on the front of the card, and another one on the inside of the card.
Everyday Paper Dolls Cartridge Tips
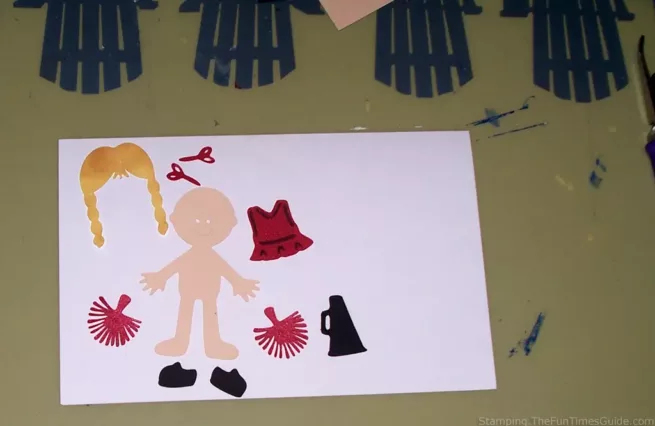
The trick to using the Everyday Paper Dolls cartridge is to choose the size you want for the body of the doll, and leave the Cricut on that size for all the accessories.
On my card everything is 3-1/2″. Using the same size for everything will ensure that clothes, hair, shoes, etc will fit on the body.
Each page shows a specific doll ensemble, complete with the needed accessories for that activity. For example, on the cheerleading page, these are listed:
- hair bows
- hairstyle
- pom pons
- shoes
- skirt
- top
- megaphone
- pennant
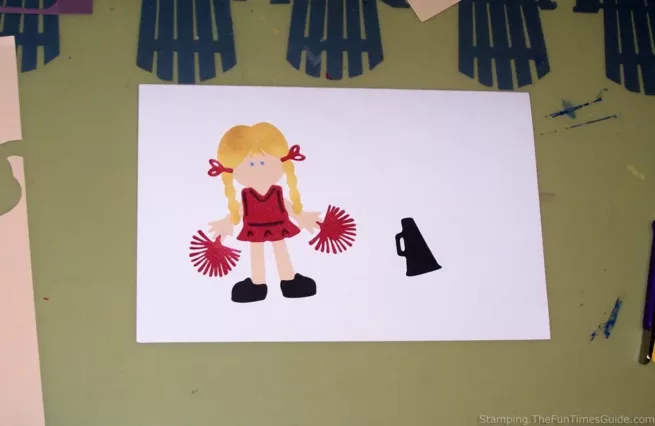
The hairstyle on this page does not match the little girl who would be receiving the card, so I shopped for another style on a different page. You can mix and match any element of any page to create the figure of your choice.
Putting The Pieces Together
The colors for the cheerleading team are red, black and white.
I cut the skirt and top out of shiny red cardstock and used a black Sharpie to make the black lines. Red pom pons and hair bows and black shoes complete the outfit.
I had a 12×12″ sheet of Honey Bear paper from Paper Adventures that was perfect for the hair braids.
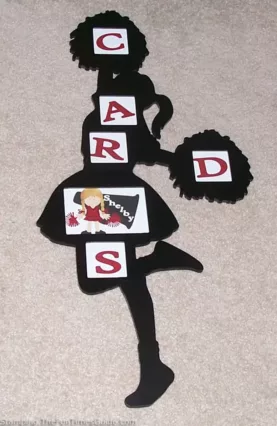
The megaphone is the only item that was not cut at 3-1/2″. That size is perfect for the cheerleader to hold in her hand, but my large one is 15″ with 1″ letters (spelling CARDS, the nickname for her team).
The other letters on the front and inside are 3/4″ in roly poly, with a 1-1/4″ ‘H’.
Finishing Touches
Assembling the doll was fun — exactly like it would be with real paper dolls!
I didn’t use it on this card, but the Everyday Paper Dolls cartridge actually has a feature that can put little tabs on the top of clothes, to then fold them onto the doll (…just like real paper dolls).
Instead, I used my usual double-sided tape to attach most of the pieces. I had to use my craft tweezers and glue pen for the smaller pieces. I also used the tweezers for the letters.
Once the card was assembled, I made the envelope from complementary 12×12″ paper I had in my supply.
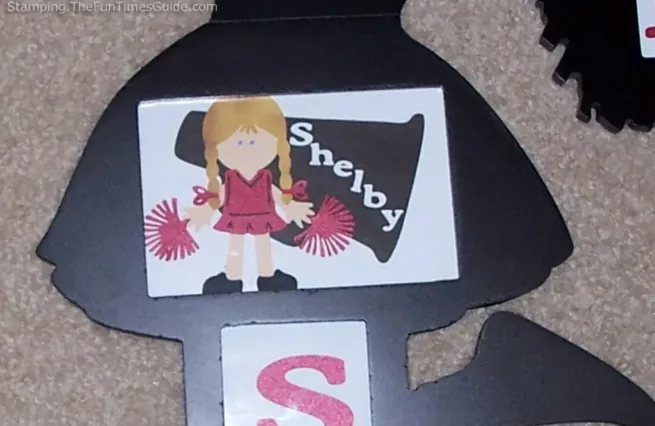
The gift to accompany this card was a cheerleader silhouette frame from LTD Commodities.
I spelled out “CARDS” in the small windows and made a panel similar to the card for the 4×6″ opening. This time I added the recipient’s name. It was a huge hit with 10-year old Shelby!
More Paper Doll & Cheerleader Card Ideas
You can get other inspiration for cheerleader cards below, as well as some other samples using the Everyday Paper Dolls cartridge. Enjoy!
- Photos Of A Great Cheerleader Card
- Bicycle Boy Birthday Card Using Everyday Paper Dolls (Video)
- Adorable Nameplates For Cheerleaders
- Cutest Little Baby Face Cards (Video)
- Hello Kitty & Other Paper Dolls


