 A friend recently asked for my best tips that would help a non-Scrapbooker to create a scrapbook as a gift for someone.
This got my wheels spinning. I’ve been scrapbooking since 1993. My collection currently tops out at fourteen 12×12 albums.
I’ve put together a few helpful tips, along with my favorite places to find scrapbooking ideas, layouts, supplies, tips, and more …online.
Tip #1: Determine the size and type of album you want to use.
My personal favorite is the strap-hinge album. (These are the Creative Memories type albums, though they’re sold practically everywhere these days.) I like them because they are:
- very high quality and durable
- available in a variety of sizes and colors
- highly expandable and can accommodate bulky items with ease
- have side-loading page protectors
To add something else to the page, simply slide off the protector, add or change the page, then slide the protector back on — all without having to remove any pages from the album itself. The downside is: These albums are a tad more expensive. But I use the 50% off coupon at Michael’s (found in most Sunday newspapers) — and you can’t beat it at half-price!
It’s your first scrapbook, so don’t get all bogged down on the details associated with which scrapbook album is best. Each has its own set of pros and cons; and you’ll find avid supporters for every type of album. Rest assured, should you later decide to create a 2nd scrapbook, you’ll have a better idea of the type of album(s) that would be best for you — at that time. Heck, for your very first scrapbook, you may just decide on-the-spot at the craft store where you choose to buy all of your supplies. Whatever they have on hand… that’s the type of album you choose to go with! Either way, your album choice will dictate how many pictures you will need to gather, how much room you’ll have for embellishments (stickers, picture borders, journaling, etc.), and maybe even the type of “theme” you decide to go with.
Tip #2: Decide on a “look” or theme you are going to use throughout the album.
To get some basic ideas of the wide variety of layout themes and styles out there, spend a brief amount of time:
- Visiting some online scrapbooking sites.
- Browsing through some books about scrapbooking at the public library.
- Flipping through magazines such as Creating Keepsakes or Memory Makers (which are available at most bookstores and craft stores).
In a very short time, a certain style will begin to feel “right” for your album. At which point you will be able to purchase your supplies (papers, embellishments, stickers) based on how well they complement the look or theme you are going for.
Tip #3: Get your creative juices flowing by exploring the scrapbooking layouts of others.
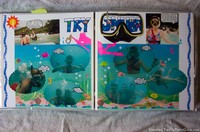 Start gathering examples, and make notes of ideas as they come to you. Jot down all of the ways that you could change or manipulate some of the things you’ve seen in order to make to make a similar layout yourself. Remember to think outside the box!… Few layouts will be so perfect that they could be completely replicated and used in your own album. Instead, think about the individual bits & pieces that went into the making of that page, then take one or two things away as ideas to use on your own pages. Any scrapbook layouts that you come across and hope to replicate, SAVE THEM! In books and magazines, simply flag those pages with Post-It notes… and for ideas you find online, simply Right Click, then choose Save Picture As, then choose the folder you wish to save all of your creative ideas in. (If you’re REALLY organized, you could go so far as to create SUB-folders to store ideas by category!)
My favorite online sites with the most creative scrapbooking layouts:
- dMarie – Type 99 in the box to see all of the most recent layouts; you can further search by category at the top of the page.
- Scrap Village – My favorites are in the Village Museum/Main Floor, as well as all the 2nd Floor categories.
- Scrapbook Gallery – Check out the Member Galleries, as well as Events/Everyday Life gallery.
- Two Peas In A Bucket – Use the drop-down list (top right) to view scrapbook layouts from various categories.
Tip #4: Gather your scrapbooking supplies.
 More than likely, you’ll want to visit a handful of craft & hobby stores in your area — if nothing else, than to make sure you’ve seen everything that’s available that fits the “theme” of your album. My favorite stores (in this order) are: Michael’s, JoAnn’s, and Hobby Lobby. But if you want to kick it up a notch, you’ll enjoy exploring the wide variety of scrapbooking supplies available online. The best part: most ship same- or next-day! There are literally hundreds of online shoppes, but my favorites are dMarie and Sticker Planet. And, don’t overlook the bargains that can be found online via eBay and Amazon!
Tip #5: To assist you with the task of journaling, keep an idea notebook filled with catchy phrases that would make fun page titles, photo captions, or meaningful poems on your pages.
You’ll thank yourself later, because journaling isn’t the easiest thing to do on-the-spot! The more you save ideas as you get them, the easier this step will be later. And, before you go thinking that you can just create your pages without journaling… NO YOU CAN’T! Because, then it wouldn’t be a scrapbook… it would be a photo album. You should just buy a $9.99 photo album with individual slots for photos if that’s all you want. A scrapbook is a personal work of art, and the meaningful words and phrases that are used to illustrate what’s going on in the photos are the icing on the cake! Anyone who views your scrapbook will value the journaling as much (if not more!) than the photos themselves. For cute phrases, catchy titles, and other wordy inspiration, try these online sites: dMarie or Inspiration Peak. For some historical facts about a particular year (great for gathering interesting facts to use on your pages), try dMarie’s Time Capsule.
Tip #6: And now, for the creatively challenged (otherwise known as the intimidated scrapper)… consider the following shortcuts that will help you create some simple scrapbooks:
- ABC albums are without a doubt the easiest type of scrapbook to put together. On each page (or double spread), you feature one letter of the alphabet. For example, in a “This is Your Life” type of album, for “A” you could do a page about your personal collection of Angels; “B” for a page about the Boys in your family; “C” for a page about your favorite Car. Or, you could choose to make all of the A through Z’s be related to ONE topic — such as “school” or “family”, etc. A finished ABC album looks much more organized in the end than simply a bunch of disjointed pages about random topics haphazardly tossed into an album. So, if you haven’t picked a “theme” for your album yet, consider an ABC album.
- Another way to “fake” your level of creativity is to purchase a couple of pre-packaged “themed scrapbooking kits”. Available in stores and online, they include enough stickers, photo frames, fun-colored papers, etc. to complete several scrapbook pages. With a couple of kits, you should be able to complete an entire scrapbook album. …You just add the photographs and the journaling!
- Finally, if you choose a smaller 5×7 or 6×8 album for your scrapbook, it will require less time and creative thought on your part. Since you can only fit 1-2 photos on a page, and there’s not much room for creative embellishments, the end result will be short and sweet — more sentimental than anything else.
I'm a lifelong scrapbooker who's been documenting every moment of my life in pictures… for decades! I currently have 171,285 photos saved in 6,034 albums online (backed up in 3 different locations). I switched from old-school photo corners and thick paper binders to archival quality tape and Creative Memories albums after college. To me, there is absolutely nothing better than preserving your life's memories in photographs… and scrapbooks! Then I added rubber stamping and cardmaking to my craft talents… followed by candle making, paper crafts, and other DIY projects. When I'm not crafting, you'll find me at the corner of Good News & Fun Times as publisher of The Fun Times Guide (32 fun & helpful websites).


