This fun spotted Easter egg has a cute little surprise inside!

Here’s how you can make your own peekaboo Easter card…
DIY Easter Card = A Bunny + A Peek-a-boo Egg
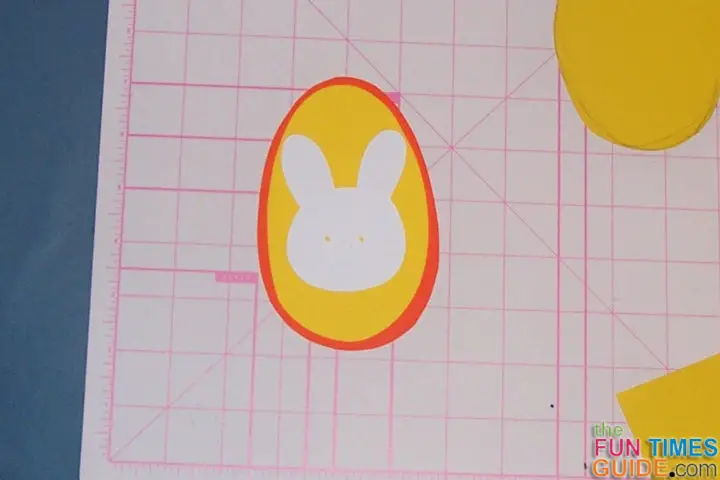
I started with the little 3-inch bunny which I cut on my Cricut Expressions using the Doodlecharms cartridge.
Then I used a pencil to draw my own Easter egg around the bunny.
Keep the bunny’s ears close to the top of the egg. The bottom of your card can be as big as you want it to be. A gigantic Easter egg with a tiny bunny would be really cute!
It took several tries before I had a shape that was close to an egg. I cut it out and continued to make the shape better on orange cardstock.

My egg ended up being 5″x3-1/4″.
It would have been easier if I had printed an egg shape from my computer. (Clipart would have been perfect.) So do yourself a favor and do it the easy way!
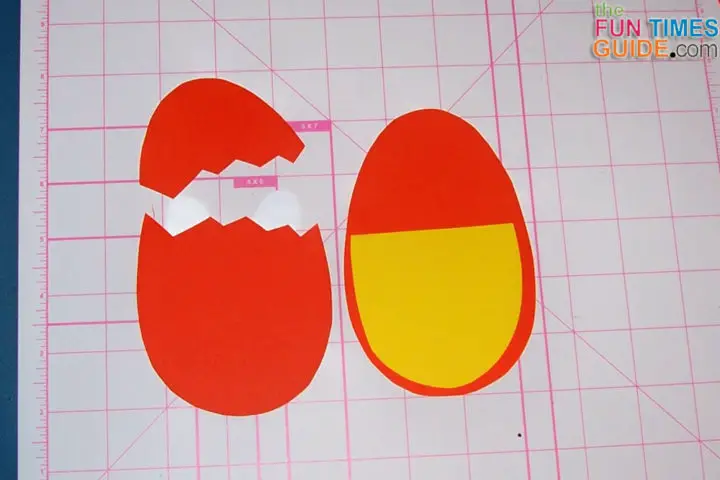
Once you have your egg shape, cut out 2 from the same color cardstock paper.
Then cut a 3rd egg, smaller by about 1/4″ all the way around. It can be any color you like since it will be hidden. I made mine yellow so you can see it.
Lay the bunny on your card (orange), always ears to the top, and put your smaller egg (yellow) on top of the bunny.
Using a pencil, mark the yellow egg about 1/4″ below the bunny ears. Make a straight cut across the egg at that mark.

You will be using the bottom part of the egg as a pocket on your card.
Place the bottom part onto one of your orange cards and make a pencil mark on the orange egg about 1/2″ above the top of the straight yellow part. You will follow this line to cut the “cracked” part of the egg.
Now you can glue the yellow pocket to the bottom of the other orange egg, making sure the glue does not cover more than 1/4″ on the edges of the yellow egg — you want the middle part of the pocket to be “not glued” so it can hold the bunny.
Must read: How To Know Which Craft Glue To Use When
Tuck your bunny into the pocket so that his ears are very close to the top of the orange card.
On the other orange egg, cut a “crack” along the straight line you drew. Make the diagonal cuts small, like they might be on an actual egg.
Lay the cracked egg topper on top of your bunny. Place the bunny ears as close to the top of the egg as possible. Make sure the bunny’s body is centered as much as possible and completely covered by the egg.
Use a small piece of clear tape to very lightly tape the top part of the cracked egg to the bunny ears.

Tuck your bunny into the yellow pocket. Make sure you can align the top of the 2 orange eggs while the bunny fits into the pocket. If that works, take the bunny out, gently remove your tape, and glue the bunny and top of the cracked egg together.
NOTE: You are placing the glue on the front side of the bunny ears and the back side of the egg. If that doesn’t work at first, you may need to reposition the bunny ears on the top part of the cracked egg until it lines up.
Now you are ready to glue the orange eggs together. Line up the bottom edges of both eggs and place glue along the yellow pocket and near the bottom edges, then secure them together.
Place the bunny back in the pocket and line up the 2 pieces of the front egg. It should look like 1 orange egg!
Now it’s time to decorate the Easter egg…
I used my Cricut to cut small, colorful circles (1/2″, 3/4″ and 1″). Gluing them all over the egg, I allowed some of them to overlap the edges to appear as if they wrap around the egg.
On the top of the egg, I placed a 1″ circle that hangs over the edge, and I purposely did NOT cut it to line up with the egg’s edge.

This will serve as the pull-tab for the bunny (the fun surprise inside this card).
I decided to not write the word “pull” on the tab, to increase the suspense for my young Easter card recipients.
In my house, we decorate our real Easter eggs with crayons before we dye them, so I used a crayon to write the card recipient’s name on the egg.
You can get creative and decorate your egg any way you like!
Finally, using red cardstock, I created an envelope for my peek-a-boo Easter card following this method. I added some of the circles leftover from the egg to the front of the envelope.
Have fun making this card. Happy Easter!


