How To Make A Paper Envelope
When you want to make a handmade card, you have many options for buying pre-made blank cards and envelopes — ready for you to personalize and decorate.
You can buy them in packs from 5 to 50 in all colors, both online and in stores.

These are great for making multiple versions of the same card — such as for Christmas cards or party invitations.
But, sometimes you might make a card with a unique shape, size, or paper!
I love to match my cards to the envelope — so when I use a print or patterned paper on the card itself, I always make sure to have a sheet of paper leftover for the envelope as well. (It doesn’t always have to be the exact same sheet of paper — any complementary design or color works.)
TIP: Remember not to make the card so big that the envelope paper won’t cover it!
Okay, are you ready to have fun learning how to make an envelope out of paper for any situation?
First, A Few Tips…
- Making a paper envelope is basically just folding and gluing a piece of paper around the card.
- You can literally wrap your card like a present — using double-stick tape or a glue stick instead of tape.
- Thinner paper will be easier to fold, but you can also use cardstock or any other paper.
- Practice using scrap paper or newspaper before you use your one good sheet of patterned paper.
How To Make An Envelope For A Card
Someday, I will master the art of the video tutorial. But for now, you get these old-school, step-by-step photos!
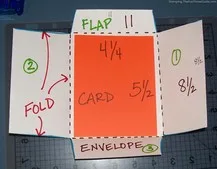
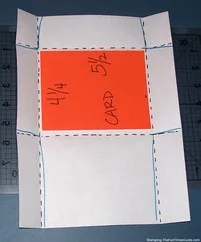
For this example, my card is 4-1/4 x 5-1/2 (known as standard envelope size: A2) and my envelope is starting its life as a piece of paper (8-1/2 x 11 size).

Follow the dotted lines to fold the paper all the way around the card.

Be careful to not fold the envelope too tightly on the card — so the card can slide into the envelope. You can draw folding lines on your paper (wrong side up) or you can just fold around the card (like a present).
Next, follow along the blue lines to cut away the parts you won’t need.


The next 2 photo diagrams show you the order to fold the 3 sides (all but the envelope flap) and use your double-stick tape or glue stick to secure the paper envelope in place. I use Tombow Mono Permanent Adhesive.

…And just like that, your envelope is done!
Of course, it will look much better when you use a fun piece of patterned paper that matches your handmade card. All the markings and lines you see here were simply used to illustrate each individual step for making paper envelopes.
But that’s the basics of how to make envelopes step by step.

When you’re ready to seal your envelope, I suggest using a glue stick — because it will be easier for the recipient to open. Be sure to let it dry completely before you put it in the mail.
MUST READ: How To Know Which Craft Glue To Use & When To Use It
Landscape (Wide) vs Portrait (Tall) Envelopes
Depending on your patterned paper or the orientation of your handmade card, you might need to place your card “the other way.”
These 2 photos show where to cut the paper for your envelope when your is card placed inside “landscape” (wide) instead of “portrait” (tall, like in the examples above):

TIP: Take the envelopes that your bills come in and unfold them. You will see a close-up example of the basic “landscape” envelope template that I’ve used here.
Bonus Tips For Making Envelopes
The following example shows one reason why you’ll want to pay attention to the orientation of your patterned paper. As you can see, when using paper with numbers on it, you’ll want the numbers to face the right way:

And finally, to send your new handmade envelope through the mail, you will need to use a blank label for the address (if your envelope is made from patterned paper):

So now you have the skills needed to create custom envelopes for any size card!
I’ve found that practice makes perfect. Have fun experimenting.
I’ll be back soon to show some handmade cards in a wide variety of shapes and sizes — and how to make envelopes to match them. In the meantime, get out there and create!

Even More Unique DIY Envelope Ideas
In addition to the step-by-step instructions I’ve shared above, here are some additional resources which will show you how to make an envelope in lots of different fun shapes & sizes:


