I wanted to make an awesome thank you card for some friends, so I decided to try this fun interactive Tetris card.

My card was inspired by this handmade video game card I saw on Pinterest:

I ended up using slightly different techniques than the creator of that one does, so go ahead and look at that example first. That way, you will understand the differences as I describe them.
I hope you enjoy this handmade Tetris video game card tutorial…
#1 – Make The Tetris Game Pixels
The first step for this card is to make pixels – lots and lots of pixels!
![]()
I used a paper cutter to make ¼” strips in the basic Tetris colors: red, blue, green and yellow.
Then I used tiny scissors to cut the strips into ¼” square blocks.
I started out trying to be very specific with this measurement. But after about 50 pixels, I just started eye-balling it to get the remaining square blocks close to that size.
As a result, some of the squares are not exactly…well, square. This is okay because I have so many pixels that I can easily set those aside for another use (described later).
#2 – Make Other Unique Tetris Shapes
Now it’s time to make the many other classic Tetris game shapes — the ones that aren’t perfect squares.
![]()
I sketched out the shapes first.
The base of each piece is a ¼” strip of the same color, and you can use regular tape to connect them from the back like this:
![]()
The pieces are so tiny, I used these tools:
It definitely takes longer to make the pieces than it does to play a game of Tetris, but it’s still fun!

#3 – Secure The Game Pieces Onto The Card
To assemble the various pieces into a game for the card, start by lining up the bottom row.
Set these up on your workspace (or on a spare piece of paper), but don’t glue any pieces down until you’ve created a layout that you like.
#4 – Determine Your Special Sentiment For This Card
Before going further, you’ll need to decide on the message you want the card to have.
The message on the card I used as my example was “You are an awesome DAD.” I decided mine would be “I [heart] YOU.”
I originally wanted to use “thank you”, but you’ll see in a minute why that didn’t work.
#5 – Make The Sliding Letters For The Sentiment
Okay, so you have the bottom row of Tetris game pieces in place, and you know what your message is going to be.
Next, you’ll want to assemble (off to the side) the sliding part that makes this video game card interactive — as seen on the example card:
These pixels are white, so they will definitely stand out from the other game pieces.
But this part took a little creativity, since I wanted each letter to be 4 pixels high — to match the other game pieces.
#6 – Finish Creating The Game Board
Once you have the sliding letters assembled, you can continue “playing” Tetris and moving the other game pieces into place.
You get to decide if you’re a Tetris Master (with all the game pieces fitting together to make a solid board) or more of a novice (with blanks showing up when the pieces don’t fit). My card shows the game as I usually play it — which is somewhere in between.
You can build the game on your card as tall as you want to, simply by adding more and more rows of playing pieces. This might be determined by how much patience you have for cutting and assembling pixels!
The final size of your playing board will determine how big your card will be, so keep that in mind — especially if you plan to mail the card.
Your sliding game pieces will be the last pieces on the top, and you’ll need to have blank space as a background above the pieces to allow for the hidden message. The best thing to do is place the sliding letters straight across in a row.
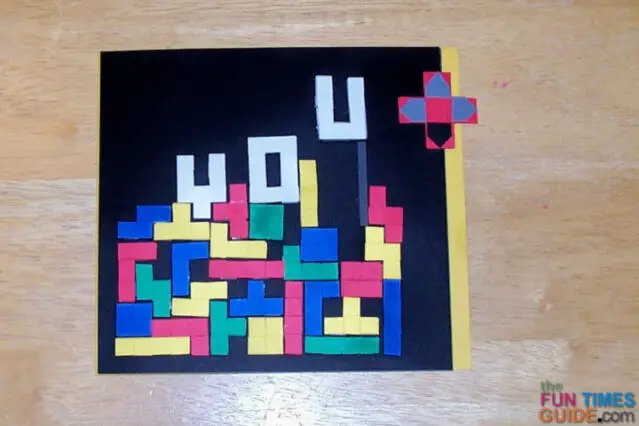
My card has 12 rows, including the sliding “Y O U.”
The base for my game board is black cardstock (5-¼” x 5-½“), leaving about 2 inches above the top row of game pieces.
Once you’re happy with the placed pieces and with your sliding white letters settled into place, take a quick picture. Now, you can move the pieces onto your actual playing board, and simply follow your picture for the actual design.
Use pop dots to adhere your Tetris game pieces to the background. The ¼” square pop dots are perfect for this project, but you can cut larger ones down to that size if you already have larger pop dots in your craft supply stash.
DO NOT attach the sliding letters to your playing board. With the sliding letters still in place, make a light pencil mark on the playing board background — at the right edge of the far right letter. (In my case, the U.) Mark from the top right corner of the letter straight up about 1-½”. Use an exacto knife (or very sharp tiny scissors) to cut a slit along this line, 1/8″ thick. This will be the “channel” for your sliding strip to move up and down.
#7 – Make The “Slider” (a.k.a. The “Controller”)
Now you’re ready to move the white letters.
Use a sticky note to grab them, being careful to leave them in their exact placement — like this:

Adhere them with the pop dots to a piece of cardstock that’s the same color as your background. (Mine is black.) Choose a size just as big as it needs to be to hold the letters in place.
Here is why it’s a good idea for your white sliding letters to be straight across in one row:
The black part holding your letters can be cut into a rectangle that is just slightly taller than your 4-pixel letters. I made a mistake on this and had my white Y O U letters all over the place. I thought it looked cool that way. But later when I tried to cut around the letters on the black cardstock, it became a problem. You’ll see.
After you have the sliding letters glued to your slider with pop dots, cut a matching strip of cardstock — 1″ tall and at least 2″ wide. This will be the strip behind the card that is used to slide your message up and down, the “controller” if you will.
Cut a 1-¼” square in any color (mine is red) and cut out the corners — so it’s shaped like a plus sign.
For the directional markers, cut 4 little shapes that look like a house (a square with a point on one side). You can also just use small triangles. Mine are about ½”.
Use one color of cardstock for 3 matching pieces, and a unique color for the 4th one. This will be the one used to indicate “down” — the direction you want your recipient to move the piece.
Place one piece on each arm of the cross (with the special color pointing down). Then adhere the piece to the end of your strip.
Ok, now it’s time to put your slider all together…
#8 – Dealing With Slider Issues
If you look at the example card, you will see these instructions:
Place the sliding strip behind your game board, with the strip showing at the bottom of the channel you cut. Add a thin strip of adhesive onto the sliding strip from the front, through the slit. Attach your rectangle, with your letters on it, to the adhesive, lined up so the letters will be in place.
This sounds super easy. And there are great pictures to demonstrate all of these steps. But I found it would not work that way for me — for these reasons:
- My letters Y O U are not straight across in a line, so my letters cannot sit on a rectangle-shaped piece.
- I nestled the U deeper into my game pieces. (Again, how cool… but no.) The yellow pixel piece on my card that is to the right of the O is seriously in the way of any sliding strip moving below it. There is a pop dot at the top of that piece, holding it in place — so nothing can move behind it. In the video, she doesn’t address having this problem with her card. It looks like the cardstock holding her white letters slides behind the purple and blue pixel pieces, which means they cannot have tape on them.
- I couldn’t find an adhesive that worked in that tiny channel to hold my slider in place. It was either too messy (liquid glue), too thick (pop dot a.k.a. foam tape), or just not strong enough (double-sided tape).
So I had to improvise with my game pieces.
I had already secured my pixel pieces with pop dots, and I could not remove or rearrange them without leaving tape marks. And starting over was NOT an option. So I decided to adhere my Y and O just like the other pieces and have the U be the one that slides up and down.
This made it much easier to resolve all of the problems I mentioned above.
I put the U on a rectangular piece exactly its same size, and now it slides right down without interference from any of the pixel pieces.
I cut my channel slightly wider, and this time liquid glue (carefully placed with a Q-tip) worked great.
I did have trouble with the cross-shaped piece sticking onto the strip with just double-sided tape. It simply didn’t seem sturdy enough to me, so I revised my strip:
I cut one red cross the same size and left it blank. I stapled it to the end of my strip and then adhered the original red cross (with the directional arrows on it) to the top of that one with double-stick tape. Now it will withstand numerous hours of playing fun!

Now I have a different problem. Since my sliding piece is only the letter U, the mystery message to be revealed when it slides down can be no bigger than the U.
This is when I decided to change my message to “I [heart] YOU” instead of “Thank You” – the word “thank” will no longer fit.
The takeaway:
Essentially your hidden message can be no bigger than the piece of cardstock holding your sliding white letters. When the slider is at the very top position, your hidden message should be completely hidden. As you move the slider down, the hidden message begins to reveal – and when the slider is at the bottom, the complete mystery message can be seen. So do yourself a favor and keep this in mind as you assemble the Tetris game pieces on your board!
For the hidden message, I used a metallic sharpie marker and drew “I” and a heart.
#9 – Finish The Tetris Game Card
I attached my Tetris game board (with slider a.k.a. “game controller”) to a yellow card base that is 11-¾” x 5-¼”.
The black cardstock that holds my playing pieces is 5-½” x 5-¼” and it fits completely over the yellow card front, allowing the extra ½” of yellow to show on the right side.
Inside the card are four 2-¼” squares, placed to resemble one of the Tetris pieces, that I used to hand write my personal note of thanks:

Remember all those extra pixels from the beginning of this card? Add them to your envelope as fun confetti!
I was with my friends when they opened this card, and it was fun to see their reaction to it. Without any prompting from me they knew to slide the controller down — which revealed my hidden message perfectly. It was definitely a hit! With some patience and a good set of tweezers, you can make your very own handmade Tetris game card.
I don't buy greeting cards or holiday cards anymore — I make my own! I also do some rubber stamping and scrapbooking. But mostly I enjoy creating handmade, one-of-a-kind cards. I’ve been an avid crafter for most of my adult life. My crafting addiction started with cross-stitching, then moved on to wearable art, projects with painted wood, fabric crafts, and then paper crafts — which has transformed primarily into card making. I also make the occasional wreath, snowglobe, and other holiday crafts.