Sweet treats.
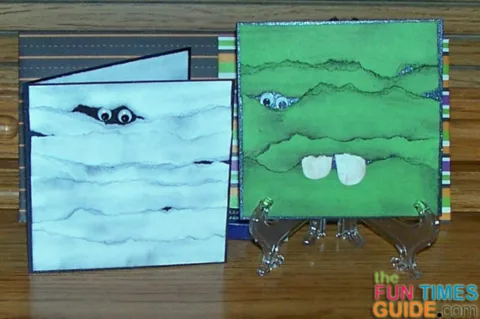
These Ghost and Frankenstein Halloween cards are easy to make and sure to please!
Inspired by this Halloween card on Pinterest, I made 2 adorable Halloween cards in no time.
Meet “Little Franky” and “Ghost Mummy”…
Each of my handmade Halloween cards starts out with a 4×4” card base of black shimmer paper.
#1 – Little Franky Halloween Card
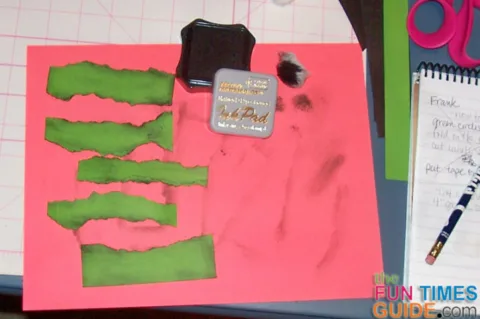
For the Little Franky card, I cut a strip of 4” green paper to tear into strips.
The paper strips can be any width, and there is no rhyme or reason to the tearing method.
I wanted all the edges of my green paper to be straight, so I made sure to have a top and a bottom strip with 3 straight sides (2 square corners) and only one edge torn.
For my card I used 5 strips total but you may have more or less, depending on how wide you make them. It is not necessary to completely cover the black part of the card, and you will definitely want to leave space for the eyes, and teeth if you want them.
How To “Ink” Paper Strips
For the first time, I decided to “ink” the edges of the strips — to make them look old or distressed.
I have always been hesitant to try this, thinking it would leave ink smudges on my hands as well as anyone else holding the card. But I was pleasantly surprised!
The ink did make my hands smudgy as I continued to work with the strips and attach them to the card, but the card dried nicely and is no longer a threat.
I used the same black ink pad that I use for rubber stamping (Marvy Matchables raised dye-based ink pads) and a cotton ball.
How to do it:
- Dab the cotton onto the ink pad, and remove the excess ink by stamping the cotton ball onto a piece of scrap paper.
- Then, run the inky cotton ball completely over all the edges of your torn strips.
- You can stop there, leaving the rest of the surface green — or lightly run the ink over everything, as I did.
- Make sure the ink is not too heavy in any one place — so that your surface looks old and distressed, rather than blotchy.
- Wash your hands before you move on to the rest of your card.
Adding Googly Eyes & Goofy Teeth
Before using Tombow double-sided tape to adhere the strips of paper to the card, I first decided where I wanted to place my googly eyes and arranged the strips to leave an opening in the right spot.
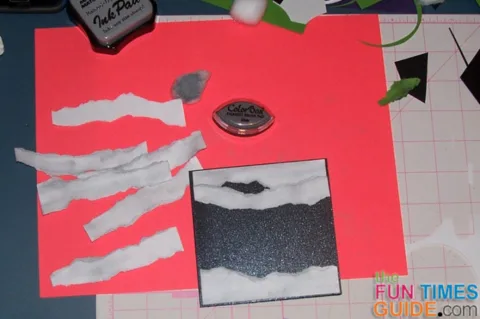
I started with the top and bottom strips to make certain the corners were lined up.
Once the strips were in place, I used Zig glue to set the googly eyes in place. I would have preferred to use different sized eyes, as on the inspiration card, but I used what I had on hand.
I decided to add a couple of goofy teeth, cut from white paper and distressed with tan ink. If I make this card again and use teeth, I will make sure to place the eyes a little higher and more centered — because I don’t really like the placement of them on this card. But hey, it’s Frankenstein, so anything goes!
#2 – Ghost / Mummy Halloween Card
For the ghost (or mummy!) Halloween card, I followed the same technique — using white paper strips and a silver ink pad (Clearsnap Color Box pigment ink cat’s eye brush pads) to distress them.
My paper strips are a little thinner and I used 7 this time.
I had not intended to use teeth or leave space for a mouth, but I think the tiny space towards the bottom right looks just like a little “o” mouth — a happy accident! I used the same process as with the Little Franky card to adhere the googly eyes.
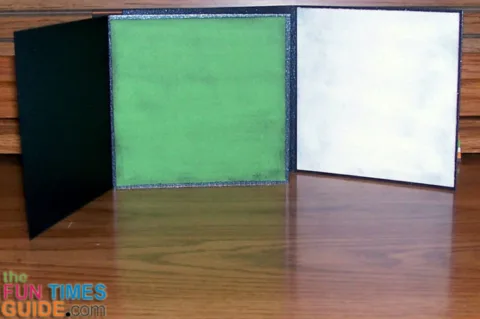
The inside of each card is a 3.75” square of green or white paper, distressed with the same color ink as the front.
Matching Envelopes & Personal Sentiments Inside
I used sheets of paper with complimentary Halloween colors from my DCWV Fall Stack to make matching envelopes for each of these Halloween cards. I made the envelopes rectangular in shape, to avoid the extra charge for postage on square envelopes.
I’m going to hand write my Halloween sentiment inside, but you can add your own touch with Halloween stamps or sentiment stickers.
Have fun making your Halloween cards! These are super easy, so make one for all your ghoulfriends!
Other Frankenstein Card Ideas
- Friend. Good. Frankenstein Card
- Happy Haunting Frankenstein Halloween Card
- Stampin Up Franky Punch Art Card
Other Ghost / Mummy Halloween Card Ideas
- Mummy Halloween Card With Googly Eyes
- Ghouls Just Wanna Have Fun Halloween Card
- Boo To You Mummy Halloween Card
I don't buy greeting cards or holiday cards anymore — I make my own! I also do some rubber stamping and scrapbooking. But mostly I enjoy creating handmade, one-of-a-kind cards. I’ve been an avid crafter for most of my adult life. My crafting addiction started with cross-stitching, then moved on to wearable art, projects with painted wood, fabric crafts, and then paper crafts — which has transformed primarily into card making. I also make the occasional wreath, snowglobe, and other holiday crafts.

