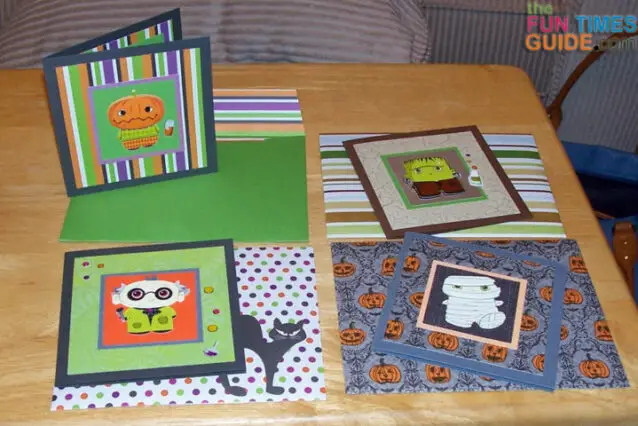
These Halloween cards are super cute and easy to make.
They’re similar to the DIY mini cards and envelopes that I made for Halloween last year.
All you need is some simple Halloween stickers and Halloween colored paper scraps!

The Basics: Halloween Paper & Stickers
I used dimensional Halloween stickers (pictured, from Michael’s), but you can use any kind of Halloween sticker you may have. I think Halloween dimensional stickers look best.

I took an opportunity to use small pieces of my paper scraps from the DCVW Fall Stack along with scraps of plain cardstock to make these Halloween cards.
If your scrap paper colors don’t seem to match your stickers, then consider getting a packet of scrap paper or some Halloween themed paper.

Tips For Finding The Best Paper And Stickers
The base of each card is solid-color cardstock paper, folded into a 4×4” square card.
I planned each of these cards to open from the right, but they could just as easily open from the bottom if you prefer that style.
The next step is to plan the coordinating papers to place on top of the base. The great thing about the dimensional Halloween stickers I used is the fact that they’re packaged on a clear piece of plastic, so you can see what the sticker will look like with different color options.
For example, in this next picture, I was checking out color options for the mad scientist sticker. I initially thought it would look great on lime green paper, but once I tried it, I didn’t like how it looked. After I chose the color for underneath the sticker, I played around with my paper scraps to find the other papers to go on each card.

Have fun with this part! Mix and match to find combinations that look pleasing to your eye and bring out the colors in the stickers. As you can see on my cards, each combination is unique — sometimes using a patterned paper, sometimes using all solid colors.
Designing The Outside
Center each sticker on a square 2×2″ paper scrap.
Place that on top of the next layer: a square of 2.25 x 2.25” paper. This allows a small frame of color to show.
The next piece of scrap paper is the biggest at 3.5 x 3.5”, and you can see that I chose this square for my brightly colored patterned paper since it has the largest frame showing. This final square is then centered on the front of the card.

Designing The Inside
The inside of each card has one or 2 squares of paper, depending on how dark the colors are.
If the main square is too dark to write on, I add a smaller square for writing. These squares are 3.5 x 3.5” and 3×3”. Some of the stickers on the sheet were tiny ones that seemed to match the main sticker, so I added those randomly to the front and sometimes on the inside of the card.

Making The Envelopes
Matching envelopes for each handmade Halloween card were made using this method. (You can see all 4 envelopes for these cards in the very top photo above.)
Since most of my remaining matching paper scraps were too small to make an envelope, I made a matching envelope liner to coordinate with the card.
The envelopes are rectangular shaped (4.5 x 6”) instead of square like the cards — because square cards require more postage.

And that’s all there is to it!
I hope you have fun making these spooktacular Halloween cards.
More Halloween Cards To Make From Stickers
- DIY Halloween Cards To Make Using Stickers
- Easy Halloween Card Tutorial Video
- Halloween Craft Card Ideas
- Video: How To Make A Halloween Card
- Easy Halloween Cards To Make
- Halloween Cards Made With Tiny Halloween Stickers
- Video: The Neverending Halloween Card
- Lots of Halloween Card Tutorials On Pinterest
I don't buy greeting cards or holiday cards anymore — I make my own! I also do some rubber stamping and scrapbooking. But mostly I enjoy creating handmade, one-of-a-kind cards. I’ve been an avid crafter for most of my adult life. My crafting addiction started with cross-stitching, then moved on to wearable art, projects with painted wood, fabric crafts, and then paper crafts — which has transformed primarily into card making. I also make the occasional wreath, snowglobe, and other holiday crafts.